


How to Shoot a Bow: The Complete Guide
 How to Shoot a Bow: The Complete Guide
thegearhunt.com
How to Shoot a Bow: The Complete Guide
thegearhunt.com
Archery can be used for hunting, but also is practiced by many as a hobby. Some archery enthusiasts will tell you that shooting a bow can be a relaxing experience. There are a couple of options available as far as bows go for archery, you can choose to shoot a more traditional style bow, known as a recurve bow. These bows won’t come with all the fancy bells and whistles technology has to offer for enhancing your shooting performance. What they will offer you is learning a skill that not many people have the patience to learn. The recurve bow forces you to use your own instincts for aiming, making this a much more difficult skill to master.
For those looking into archery with all the more modern options for accuracy, a compound bow is a way to go. With advances in technology, hunters can now shoot at their intended target from much farther distances than just forty yards away. Shooting one of these bows will normally involve using one of the many types of sites, which can greatly improve your accuracy with practice.
Being able to shoot a bow with accuracy depends on more than just your aiming if using a compound bow, getting to know the parts of your bow can be very helpful. Aside from that, things such as how you hold the bow, how you choose to stand, and how your releasing your arrow can all affect the amount of accuracy you have. Don’t be mistaken, in thinking that you can pick up a bow for the first time and be a rockstar at it. This style of shooting takes some people years to master being accurate. The best piece of advice that can be given to learning the art of archery, patience is a virtue, and practice makes perfect.
Here you will read about techniques for shooting the recurve bow, as well as the compound bow. Finding ideas for better stance and grip, to better improve your accuracy. Knowledge is power when it comes to learning or improving on any skill, taking the time to do the research will only improve your chances to succeed.
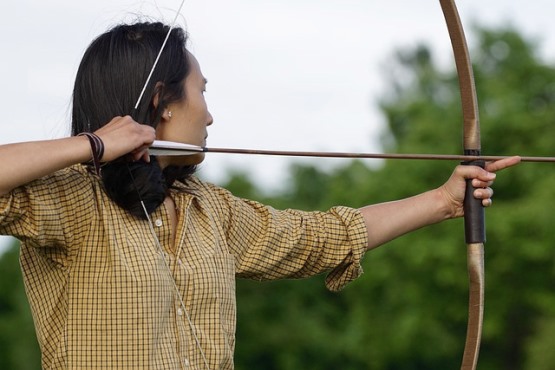
Shooting a Recurve Bow

As you briefly read before, learning to shoot a recurve bow is a whole different ball game than shooting the more modern style compound bow. Choosing to shoot a recurve bow, forces you to use your own instincts for accuracy. This means in order to master this form of shooting, you will need to have patience while maintaining frequent practice sessions. There are many aspects to shooting a recurve bow below you will find them outlined for you.
The Stance
Your stance is the way you place your body to prepare for your shot, with the recurve bow there are a couple of options to choose from. No matter which option you choose your shoulder position will remain the same, the changing factor here is going to be how you place your feet. Start with your shoulders, at a 90-degree angle to the target, from here you can adjust placing your feet. For beginners, the best placing for your feet is side by side, roughly the width of your shoulders apart. This foot position allows you the maximum amount of balance and stability needed for accuracy. Your second option for placing your feet, still the width of your shoulders apart, the difference here is where you will point your leading foot. With this position, you will want to have your front foot pointed toward the target. This stance change turns your hips slightly toward the target, creating a slight imbalance, which is one of the reasons this stance is more for those who have years of experience.
Placing the Arrow
The arrow needs to be placed in the same spot on your bow each and every time you shoot the bow. On your arrow there will be a plastic piece with a notch in it, this is the end of the arrow that will connect to the bow. Depending on your bow, you may have one or two markers on the string. These are guides for where to place your arrow, if your bow only has one marker, insert the bowstring into the notch just below the marker. For those with two markers, place the arrow between these two markers, by inserting the string of the bow into the notch of the arrow.
Holding the Bow
How you hold your bow will have a rather large impact on the accuracy of your shot. You want your grip to be just tight enough to be in control of the bow at all times. To hold your bow correctly, using your less dominant hand, take hold on the grip of the bow. Once your hand is wrapped around the grip, check that the knuckles on your fingers are at an angle of approximately 45 degrees from the grip. Holding your bow in this fashion will help to prevent you from turning inward, which can cause the string of your bow to snap your arm. Trust me when I say that does hurt, once it happens once, you will be sure to prevent it from happening again.
Gripping the String of the Bow
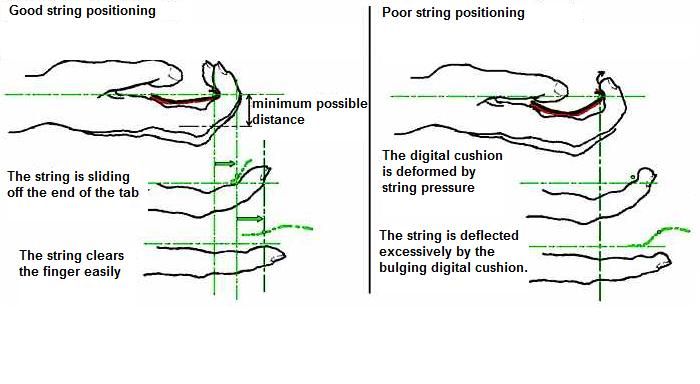
Now that you have the proper stance, place your arrow on your bow, and are holding your bow correctly the next step is teaching you how to grip the string of your bow. Although many people have different techniques for this, we will teach a grip that is said to be best for beginners. Before we begin, I will let you know that sometimes gripping the bowstring with bare hands can cause your fingers irritation. If this irritation occurs, feel free to cover the hand you use with a thin glove, this will cut back on the string rubbing on your bare skin. Grab the bowstring with your free hand, using your first three fingers only. Let that string rest inside of the bend in the first knuckles of those fingers. The location of your hand can be in one of two places, you can put all three fingers just below the arrow, or place your index finger above the arrow and the other two fingers below the arrow. Some people just starting out have said that splitting their fingers on the grip seems awkward, and seem to favor putting all three fingers under the arrow.
How to Draw the Bow String Back
Start by lifting your arm that possesses the bow to the height of your shoulder, this will put you in the best position possible for pulling your string back. One important key to this process is to remember you are in fact going to be using your back muscles and not your arms to perform this task. So before you pull that bowstring back, be sure your arm is at the correct height, then pull the string back using your back muscles not your arms. Now that you know how to pull the string back, you will need to choose a point to which you will pull the string back. This is typically a spot on your face that you pull the string to every time you bring it back. Doing this will provide you with a good level of consistency every time you shoot.
The Aim, Releasing and Following Through with the Release
Aiming your arrow is the trickiest part of this task, you have to align the tip of the arrow with where you intend it to hit the target. The trick for this is to not overthink the aiming process, in reality, you want this portion of the task to come naturally. Once you have picked a destination for your arrow, it is time to release your string, this can be done by releasing your fingers from the bow with a snapping motion. The potential for accuracy doesn’t stop at the release, you will also need to continue your releasing motion, the backward movement of your drawing hand until your hand has come to be aligned with your ear.
Practice, practice, and more practice is the key to mastering this technique. When you find yourself frustrated with the process, walk away and try again later, shooting while frustrated only causes more issues. Remember nobody, not even our ancestors, mastered this skill overnight.
Compound Bows
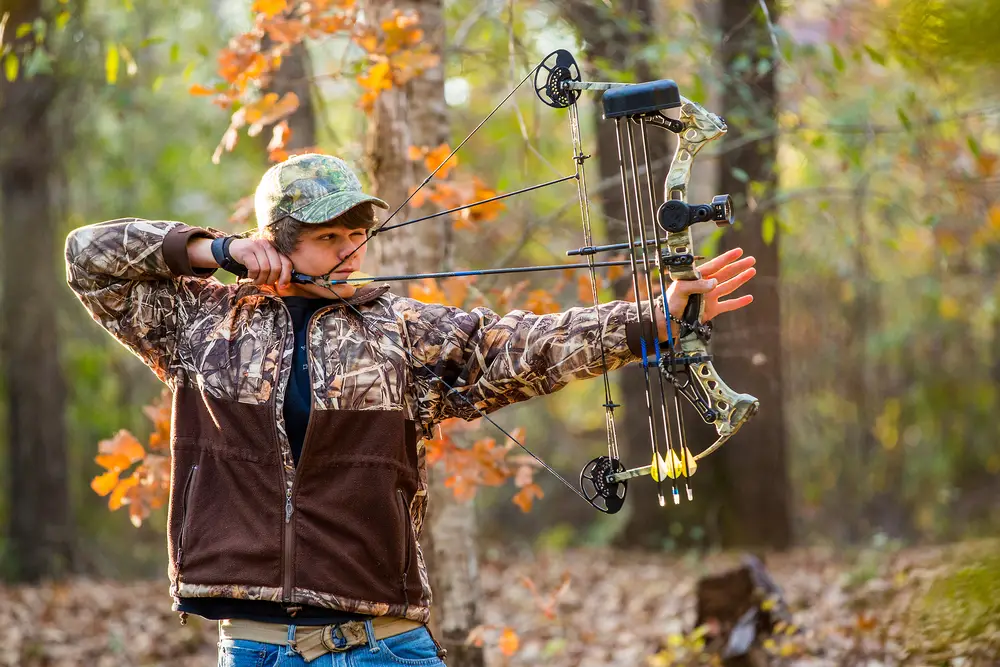
Before just going out and purchasing a compound bow, you should consider going to an archery professional to be properly fitted for the bow. Seeking professional help to set up your bow will only benefit you in the long run. A professional can help to set your draw length, which is how far back you can pull the string. They can also adjust how much resistance you feel while pulling back your bow, this is called the draw weight. Another important thing is the peep, or sight hole you will look through to line up your shot, if not in the proper position this can throw your accuracy right out the window. There are so many hidden factors in setting up your bow, that your best option is to consult a professional, once set up the rest comes with repetition.
Choosing the Release
Although compound bows can be pulled back and released bare handed, it is much easier, safer, and consistent to use a release. These are basically bracelets made from velcro, that strap to your wrist, attached to to the end of that is the trigger mechanism. This is the part of the release that will attach to the bowstring, once locked into place it will not release until the trigger is pulled. There are several different designs styles of releases on the market, but they all serve the same purpose, so choose one that makes you comfortable.
Placing Your Arrow
Compound bows will have a rest for the front portion of your arrow, this provides a guide for your arrow. Some rests are simply round in shape, with hair like material that keeps the arrow in place. Another rest option is one where your arrow starts at a downward angle, then as you pull your string back, a stand rises to hold your arrow in place. Either option is good, start by placing your arrow on the rest of your bow. Next, you will want to secure the arrow between the two markers on the string. This can be done by pushing the string into the notch of the arrow, making sure that the odd colored feather or plastic vain is on the top.
Stance and Bow Grip

The best possible position for shooting your bow is to stand with your feet approximately the width of your shoulders apart while keeping your shoulders at an angle of roughly 90 degrees to the target. This will offer you the best balance possible to maintain consistency and accuracy. Now that your release is on, your arrow is in the bow, and your standing correctly it is time to learn to properly grip your bow. Using your less dominant hand, hold the bow with an easy but controlled grip, this hand is there purely for holding the weight of the bow. Holding a grip that is too tight can be detrimental to your accuracy.
Drawing Back the String
Once you have mastered the gripping technique, you can straighten your arm and raise it to shoulder level. This will prepare you for starting the pullback process, start by locating the loop behind where your arrow sits, this is where you will attach your release. Once you release is secured, keep your finger away from the trigger until your ready to shoot, you can start the process of pulling the string back. Remember while pulling the string back, it is best to use the muscles in your back rather than your arms. At this step you want to find yourself a stopping point, this is a spot that your arrow meets your face. This can be high or low on your face, some bows will come with a kisser, this is a rubber piece that will meet the corner of your mouth every time you draw back. Just remember once you have picked a stopping point keep it, this will greatly improve your accuracy.
The Aim
Using the system for aiming at a compound bow is actually a two-part process, using what is known as the peep and the sight itself. The peep is a little piece of hollowed out rubber that is attached to the drawstring of your bow, this will move and adjust when as you pull back on the string. The sight portion of the bow will hold the pins you will use to aim your arrow. Each pin will represent a different distance, so the pin you are using will depend on the distance you are shooting from. You should know which distances your pins are set for, if not ask someone with experience. The theory behind the design, you will select the pin according to your distance from the target, align that pin to the place you wish the arrow to go on the target as you view it looking through the peep on the drawstring. So in reality, when you have chosen your stopping point, you will need to be sure that you can clearly see through the peep in the drawstring. If you can not see through the peep, you will need to adjust your stopping point until you can.
The Release

Once you have your spot on the target picked out, you are ready to pull the trigger to release the arrow. Be sure that your grip is light while your holding arm is steady. You want to be as steady as possible, any twisting motion can cause problems with accuracy, and not to mention causing the string to snap you in the arm. Believe me, that will definitely leave a mark on both your arm and your confidence. Breathe if you need to, this can be the most nerve-wracking part, especially for the first time shooter. Once the arrow has been released, you can check to see how accurate your shot actually compared to your intended target.
Now that we have been through the basic steps for shooting both the compound and recurve bows, all that is left for you to do is get out there and practice. Learning the basics will only give you the knowledge to get started, practicing and learning from your mistakes is what gives you the skills you will need for success.
Sources
- BowHunter-ED, Six Basic Steps for Shooting
- Shooting Time, Parts of a Compound Bow
- Art of Manliness, How to Shoot a Traditional Bow and Arrow