


How to Lace Up Boots: The Complete Guide
 How to Lace Up Boots: The Complete Guide
thegearhunt.com
How to Lace Up Boots: The Complete Guide
thegearhunt.com
Lacing and tying your shoes or boots is something we all learned at an early age. A simple task that we don’t even think twice about a majority of the time. Let me ask you this, have you ever found that your new boots don’t fit quite like you thought when you tried them on?
I can say yes to this, so many times I have wasted my money on boots that just didn’t work out. Mainly due to the fact that they were looser fitting than I really liked them to be. This would cause my feet to slide around inside of them, sometimes even causing blisters. I never imagined that I could solve this issue by just adjusting the way I laced and tied up my boots.
There are many different ways to lace your boots along with lacing styles for specific characteristics some may find in their feet. These techniques can be used for either your work or hiking boots. No one way is seen better than the other, only you can decide which way lacing and tying your boots work best for you.
It is my hope that this guide will help you choose which lacing method best suits your needs. This information has helped me when in a jam with boots that weren’t quite right. Allowing me to still get use from them, instead of either throwing them out or giving them away.
Boot Lacing Techniques
Heel Lock Lacing
This lacing style is used more often for hiking boots. Hikers need a lacing pattern that will keep their feet firmly secured during their expedition. Creating the heel lock will take place with the top hooks on your boots, therefore up to that point you can lace your boots in any fashion you would like. Most hikers are reported as saying they lace them traditionally up to the point of the hooks.
Directions for Creating the Heel Lock
- Always make sure your lacing is tight up to the hooks. If you have them too tight they won’t move when you tug on them. This can cause problems with the circulation in your feet. Your laces should be tight and able to move slightly when pulled on.
- At the top hooks, you don’t want the traditional crossover pattern. At this point, you want to place your laces into the hooks vertically.
- Next, you will cross and put the lace under the line you just made vertically. Do this on both sides. Once complete, you can pull your laces tight and secure them by tying the laces.
Over-Under Lacing

This style lacing will reduce the wear on the eyes of your boots. With less friction involved, there won’t be as much rubbing on the boot of laces. This is said to prolong the life of your laces. It is also faster for tightening your laces before tying them. This is due to the fact that you only need to pull every second cross.
Directions for Over-Under Lacing
- First put your lace through the bottom eye of your boot from the outside.
- Next, you will cross over your laces, at the next set of eyes be sure to place them into the eye from under the eye.
- After crossing your laces once again, this next set of eyes you’re going to want to put the lace in from outside of the eye.
- Continue steps 2 & 3 until you have laced all the eyes on your boots. If your boots have hooks at the top, you can continue the crossover pattern or choose to do a heel lock instead.
- Once all the eyes have been laced, tighten the laces to your comfort level, then tie the laces as you would normally do.
Army Lacing
Army boots are known for being thicker, the leather material doesn’t allow for very much flexibility during movement. The lacing system was design to combat that flexibility problem by putting the crossing pattern on the inside. This gives the boot upper less restrictive movement, as the laces won’t hold down the sides of the boot in this pattern.
Directions for Army Lacing
- You will need to start with the eye at the bottom of your boot. Feed the lace into the eyes on both sides of the boot from under the eye.
- Your next step will be to put the lace directly into the next set of eyes. Be sure you are not crossing the laces at this point… All you need to do is go straight up and into the eyes.
- In this step cross your laces and put them into the new eyes from under them.
- Repeat steps 2 & 3 until you have completely laced your boots. Once fully laced, tighten them to your comfort level and tie the laces to secure your boots.
Ladder Lacing
Ladder lacing is also used in some elements of the military. Used mainly by those members of the military that do a lot of marching or spend ample time on their feet. This style lacing is harder to tighten as it is known to be a tight lacing system that holds on it own. This lacing system also pairs well with high top sneakers, as well as lacing up your figure or hockey skates.
Directions for Ladder Lacing

- Start with the bottom eye on your boot, feed the lace into the eye on both side from under the eye.
- As with the army lacing pattern, your next step will be to put the lace right into the next eye. This will create a small loop that you will use in steps moving forward. Don’t cross the laces in this step, they simply go up and into the next eye.
- This step is where you will cross your laces, but instead of going into the next eye, you want to feed the lace into the loop you made in the previous step. Then feed the lace directly above and into the next eye.
- Continue to repeat the two previous steps until all the eyes have been laced. Your laces should already be tightened with this pattern, so all that is left to do at this point is to tie your laces to secure them.
Straight Lacing
Straight lacing is known for relieving the amount of pressure on the top of your foot. This pressure comes from the laces of your boots, which sometimes happens when we pull our laces too tightly. This lacing system works well for hiking in the event of an emergency, such as a brake or sprain, the laces can be cut away quickly for easy access to the foot. Although straight lacing is functional, it is more commonly used for style.
Directions for Straight Lacing
- Start at the bottom eye of your boots, feed the lace in from the outside. Make sure your laces are even after you tighten the bar you just created.
- Using the right lace, go directly into the next eye above from the inside. Then put the lace across and into that eye from the outside.
- Now using the left lace, repeat the steps, go into the next eye above from the inside. Then across and into the eye from the outside.
- Continue rotating from right to left lace to finish lacing your boots. When you have laced all the eyes, tie your boots as you normally would.
Train Track Lacing
Train track lacing provides you with a tight feel to your boots. This lacing runs close to the same style as army lacing. You will want to be sure that your not using thick laces for this lacing, as you will be feeding the laces doubly into the eyes.
Directions for Train Track Lacing
- Starting at the bottom most eye of your boot, put the lace in the eye from the inside of the eye.
- On both sides of the boot, put the lace ends into the next eye above from the outside of the eye.
- Cross your laces on the inside of the boot, then you will put the ends of the laces into the eye that already has the lace in it.
- Next you will repeat steps 2 & 3 until you have all the eyes laced.
- Your laces should end up on the inside of your boot. From there you can tie them as you normally would.
Quick Tight Lacing
The quick tight lacing splits your lacing into two sections, allowing you to tighten the top and bottom portion of your boots separately. This lacing system works well with boots that sit at the ankle or just above. It really doesn’t pair with boots that are higher cut than that.
Directions for Quick Tight Lacing
- Start on the outside of the boot and put the lace into the bottom eye on both sides.
- Using the left side of your lace, look for the middle eye of your boot, put the lace into the inside of that eye.
- With that same lace, place it into the eye right across from the outside. Now you will cross inside of the boot to the next eye. Put the lace into the eye on the inside. Continue to the next eye, crossing on the outside and then into the eye from the outside. Finish this pattern until all the eyes at the top have been laced.
- Now take the lace from the right, and make your lacing pattern the same as you did with the left lace. When you reach the last eye in the middle of the boot, run the lace diagonally to the top eye on the left. Be sure at this point that your lace is on the inside, as when you go into the last eye you want to do so from the inside of the boot.
- Now when tightening your laces, you can pull on both to tighten them together. If you only want to tighten the bottom, pull the left hand lace. For tightening only the top, pull the right hand lace. You can tie your laces in any fashion you desire.
Now that you know a few lacing styles, you should be able to fit your boots more accordingly with your feet. It is best to stick to one method once you have found one suitable to your comfort and style.
Tips for Successful Boot Lacing and Tying
- Choose a method that comes easy for you. Only you can determine how your boots should fit.
- Be sure your lace length is enough. Most lace packages will give you the recommended number of eyes for the length of lace. Here is a reference for you to use:
- Laces that are 72 inches work best for boots with 10 eyes.
- Boots with 9 eyes will need a lace length of 63 inches.
- Laces with a length of 54 inches match well with boots that have 8 eyes.
- Boots with 5 or 6 eyes can use several lengths. Length of laces for these boots can range anywhere from 36 to 45 inches. This simply depends on how long you prefer your lace for tying purposes.
- Finding that perfect fitting boot is virtually impossible, unless your willing to spend a fortune having them tailored to your feet. You can fix this issue with the lacing system you choose.
Lacing Tips for Different Feet Characteristics
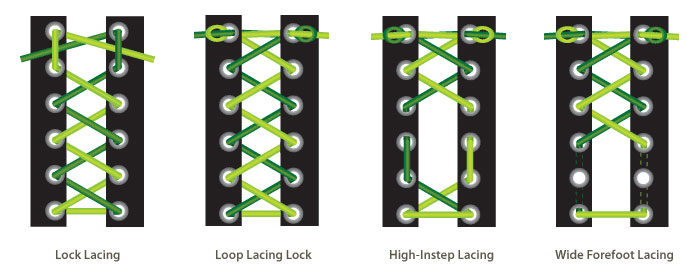
High Instep Lacing
For those with high insteps, you can provide some relief to your feet by creating a window pattern with your laces. This is simple to do, pick the area that gets irritated by the pressure of your laces. In this area you don’t want to cross your laces over. Instead you can place your laces directly into the next eye above from the outside of the eye. This will leave that sore spot on your foot open, therefore giving your foot some relief.
Lacing That Won’t Squish Your Toes
If you find that your toes become squished by your lacing style, you do have a couple options to solve this issue. The first one is to replace your one lace system, by using two laces per boot. Use one lace to lace from the bottom to the middle of your boot. Once in the middle, you can tighten the bottom portion of your lacing to your comfort level.Now tie that lace as you normally would. Use the second lace to tie from the middle to the top. Then you can tighten the top of your boot to your comfort level and tie off the laces.
Your second option is to skip the very bottom eye of your boot. Start with the next eye up, this allows you to tighten your boot while avoiding the toe squish.
Lacing for Narrow Feet
Having narrow feet can cause your feet to slide around inside your boot a little more than normal. You can try this alternative method for tying your boots to help alleviate that issue.
- First tighten your laces on the bottom portion of your boot. Before going into the boot hooks, tie a quick not to hold your lace tightening in place.
- Next you want to put your laces into the first set of hooks. Do this by putting your lace into the top of the hook, while coming out the bottom of the hook.
- Lace your next hook from top to bottom.Remembering to go into the top and out the bottom of the hook each time. Now you can tie another quick not to hold your tightening into place.
- Repeat step 3 for each set of hooks. When your finished your foot should be completely secured into your boot.
As you can see there are ways to improve your boot performance by simply changing the way you lace or tie them. So even the person with the most unique pair of feet, is sure to find help for keeping their boots comfortable.
Sources
1. Theidleman.com, How to Lace Boots Properly
2. Gore-tex.com, Tie The Knot: How To Lace Hiking Boots
3. Feetstrap.com, How to Tie Work Boots in 3 Different Ways
4. Fieggen.com, Shoe Lacing Methods
5. Oureverydaylife.com, Different Ways to Lace Up Boots