


How to String a Fishing Pole: The Complete Guide
 How to String a Fishing Pole: The Complete Guide
thegearhunt.com
How to String a Fishing Pole: The Complete Guide
thegearhunt.com
In the past, stringing a fishing pole was considered an easy, yet tedious task. There simply weren’t the number of choices inline types, reel design or even pole types as there are now. With the ever-changing times, the manufacturers of fishing equipment have given us a plethora of choices for our fishing needs. This can present a challenge for those just starting out with fishing. Having so many options can sometimes seem overwhelming, but once you understand the basics you will be surprised at what you can accomplish.
Things to consider when stringing a fishing pole
In this guide, we will explain to you the types of reels you have to choose from. Giving you some information on each of your reel choices. We will also take a look at the various fishing line choices, you will be informed of their characteristics as well as the recommended use for each line type. Another important aspect of stringing your fishing pole is caring for and storing your fishing line. You will find a section in this guide with tips for both the care and storing of your line.
After reading this guide, you should be able to better understand the differences in your choices of both reel and line types. This will help you be better prepared for your fishing experience. With any luck, you will reel in one of your biggest trophies yet.
Types of Fishing Reels
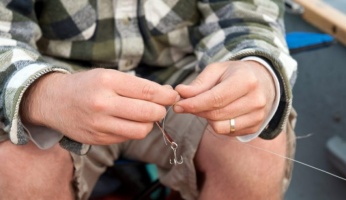
The first step to stringing your fishing pole is to choose the type of reel that best suits your needs. In order to do just that, you will need to understand how each reel works, and what type of fishing they are meant for. Although each reel has its own uses, some anglers have said that they have stuck with the first reel they learned to use. You may find that this will work for you as well. Fishing reels can be broken down into four specific groups spin casting (otherwise known as the closed face), baitcasting, spinning, and fly. You will see that each group has its own beneficial features when it comes to fishing, and all have to be strung in different manners.
Spincasting Reels
Spincasting reels are more commonly known as closed face reels. These reels are more often than not found on the poles you find for children. They serve well for adults who are also just beginning to fish. Super easy to operate, all you have to do for casting is push the button in, but remember to hold it in. Swing your arm back for a cast, as your moving forward simply let the button go free. If you don’t want your cast to go to far, push the button again and the line will stop. The spool is smaller than that of other reels, which means you will have less line to work with, but that isn’t necessarily a bad thing. Sometimes less line means less of a chance for tangles within the spool.

Instructions for Stringing a Spin-Cast Reel
- Always check the capacity of your spool. This will normally be preprinted on the reel for you.
- Take the cone cover portion of the reel off. Be sure to unwind any line that is already on the reel.
- You will want to be sure that your line spool will spin in the same direction in which the reel will spin.
- Now take the end of your line and feed it through the eye closest to the reel on your pole. Then feed the end into the hole in your cone cover.
- This is where you will fasten your line to the reel. You can achieve this by wrapping the line around the reel, then tie an overhand knot, be sure to include your standing line in this knot. As an added measure you will also want to tie the same type of knot toward the end of the loose end of your line. Trim any access line hanging after the knot in the loose end.
- Hold some tension on the line while you screw the cone-shaped cover back on.
- Keeping tension in the line, by holding it between two fingers, go ahead and reel up few feet of line. At this point you will want to take the cover off again, so you can check the amount of line on the spool. A good rule of thumb to follow, so that your spool isn’t overfilled, leave yourself ⅛ of an inch from the top.
- All that’s left for you to do is reattach the cover to the reel. Then cut the line from the spool. Now you can feed the line through the rest of the eyes on your pole. At this point, you can tie your tackle to the pole and you’re ready to fish.
Bait-Casting Reels
This type of reel was designed to handle heavier lines as well as bait. Making it successful for catching bigger fish such as bass and catfish. These are also great for saltwater fishing. The baitcasting reels are for those who can master the technique of using their thumb to control the spool. If you can successfully master that technique, the baitcasting reel can offer you a large amount of casting accuracy.

Instructions for Stringing a Baitcasting Reel
- Stringing a baitcasting reel can take two people if you don’t have a reel filling station. Quick Tip: I have a little secret that my boys have taught me. If you don’t have a filling station or a second person, you can use a vice and screwdriver. Simply place the handle of a phillips-head screwdriver into a stationary vice and tighten it down. Then slide your spool over the top of the screwdriver. There you go now you have a homemade filling station.
- Next, you need to be sure that the direction your reel will spin matches the direction of the spool. You will want their directions to match.
- Slip the loose end of the line into the eye of your pole that is closest to the reel. Now you can put the end of the line into the line receiver, be sure the line goes all the way to the back of the receiver.
- Once your line is out the back, you can tie an overhand knot to secure the line. Then clip the extra line from the loose end.
- Use two of your fingers to apply a fair amount of tension to the line. Now you can reel, maintaining tension so that the line gets reeled onto the spool without being loose.
- This reel will allow you to fill within 1/16 of an inch from the rim at the top. Overfilling your spool will only cause headaches during your fishing trip!
- You have successfully reached the point in which you can clip the line from the spool. Now you can thread the line into the remaining eyes on your pole. Lastly, tie any tackle or bait in which you choose to use.
Spinning Reels
Commonly referred to as an open face reel, the spinning reel is the most popular reel used by anglers. These are so popular because of their size range and the fact that they are easy to use. You can purchase extra spools for a quick line change while on the water. The spinning reel will not handle the heavier weight test, but can surely handle up to the 20-pound test. A couple of small issues with this type of real are occasional twists or loops that form in your line. These are minor issues and can be easily handled in the field.
Instructions for Stringing a Spinning Reel
- As always check the direction in which your reel spins and the spool. To reduce the number of kinks or twists in your line, be sure that your spool and reel will turn in the same direction.
- Start by taking the end of your line and feeding it into the eye on your pole that is the closest to your reel.
- Be sure to open the bail, then you can wrap the line around the spool of the reel once. To secure the line into place, tie an overhand knot making sure to include the standing line into the knot. You will want to tie a second overhand knot containing only the loose end of the line. This will prevent your line from slipping off. Once again after the knots are in place, you will want to clip the extra line from the loose end.
- After closing the bail, apply tension to the line while you begin to reel some of the lines off your spool. Applying tension will help to prevent your reel from being strung too loosely.
- Most spinning reels will allow you to fill them within ⅛ of an inch of the rim. Be sure to keep an eye on the amount of line you have reeled onto the spool.
- You have reached the stage where you can clip the end of the line from the spool. Open your bail, this will allow you to feed the line into the rest of the eyes on your pole. Remember to close the bail afterward, you don’t want to redo your hard work.
Fly Reel
The fly reel is not a replacement for reels used for your average fishing trip. Fly fishing is a sport all on its own. The fly reel simply holds your line while giving the line the resistance needed for you to have the ability to bring in your catch. Choosing the correct fly reel is a process, you will need to be sure the reel you choose will match the weight of the line you intend to use as well. When selecting your fly reel, be prepared to spend a little extra money, as you will need one that won’t rust when it gets wet. Those reels will cost a little more, but are definitely beneficial.
Instructions for Stringing a Fly Reel
- You will start this process by attaching your backing line to your reel. This can be done by making an arbor knot. Side note: For instructions on how to tie an arbor knot please refer to our How to Tie a Fishing Knot: The Complete Guide article. There you will find step by step instruction for tying the arbor knot plus more.
- Now you can reel your backing line onto the spool of your reel. While doing this you will want to keep tension on the backing line. This will allow the line to be spooled with a snug fit.
- This is the point in which you will tie your fly line to your backing line. The preferred knot for doing this is the albright knot.
- Now you can reel the fly line onto your spool as well. Be aware of how much line you have added to your reel. As it is recommended to not overfill your reel. This will create tangles and possibly knots in your line while you fish.
- At this point all that is left is for you to tie a leader line to your fly line and you are all set.
Fishing Line Types
Braided Fishing Line
Braided fishing line is one of the oldest styles of line known to man. There are studies showing that in prehistoric times the so-called “cavemen” used a braiding method with their surrounding materials, to create a method of fishing for themselves. It wasn’t until the early years in the 1990s that line manufacturers made changes to their materials making the braided line a more popular choice among anglers.
The braided line today is much less bulky than it has been in the past. That is due largely to the changes in technology. This type of line is considered to be very strong and can even be found up to 200-pound test. Although today’s braided line is thinner than it has been in the past, some anglers will shy away from this type of line. It is said that in the underwater world that braided line is more noticeable to the fish. This can cause some types of fish to become skittish when it comes to falling for the bait.
Monofilament Fishing Line
The monofilament line is the most popular choice in line when it comes to beginners. That is mainly because of the fact that it is easier to use than braided lines. Monofilament tends to hold better in the reel, meaning you won’t see any slippage within your reel, as compared to the braided line. The type of line tends to scare off fewer fish as it can’t be detected as well underwater.
A more experienced angler may tell you that there are a couple of disadvantages to using a monofilament line. The monofilament line has some amount of stretch to it. This will mean that the line tends to hold the shape of the reel, causing it to become curly. Also that when fishing for light-biting fish, you have more of a chance of missing that nibble. This is simply due to the stretch factor of the line, rather than sending the jolt to your pole, this type of line may absorb the bite itself.
Fluorocarbon Fishing Line
The newest form of fishing line on the market today is the fluorocarbon fishing line. This line has gained in popularity over the last few years. One factor for the gain in popularity among anglers is a simple fact that it tends to virtually disappear when underwater. Tricking even some of the most finicky breeds of fish. This line doesn’t hold a memory of shape, so it won’t have those curls in line that are notorious for monofilament fishing lines.
Proper Storage for Your Fishing Line
Learning how to store your fishing line can prevent you from having to restring your reel and pole quite so often. Storing your line properly will prolong the shelf life of your fishing line as well. Keep in mind that care and storage vary for each line type.
Monofilament and braided fishing lines can be cared for in the same fashion. You can wind them onto a spool and simply hold them in place with a rubber band. Keep in mind you will want to wrap these lines loosely, after wrapping them be sure to store them in a cool yet dry location. If your line needs cleaning, any common dish soap and a wet rag will do the trick. Simply wipe it clean with a damp, soapy rag.
Caring for and storing your fluorocarbon line is a whole different ball game. This type of line requires transferring it to a different reel for storage. This will allow to clean and spray the line with the lubricant designed specifically for the fluorocarbon lines. Once you have cleaned and lubricated the line, you can store the line on the reel that you transferred the line too. It is however recommended that before using this line after storage, you spray the line on the reel. The lubricant will work its magic on its own before your next trip.
Caring for a fly-fishing line will require you to remove the line from the reel. Use a soft cloth in conjunction with a cleaner design for the fly-fishing line. This will cover the cleaning step, in order to lubricate your line, you will need to use a proper dressing intended for lubricating the fly-fishing lines. After following these steps, you can wrap the line around a larger sized plastic canister. You are now ready to store your fly-fishing line. Be sure to keep it stored out of the sun, the rays from the sun can cause the line to become brittle.
Quick Tips for Fishing Line Care
- Make sure that when you thread your line into the eyes of your fishing pole the line makes it into the eye. Sometimes a common mishap can be to thread the line into the framework for the eye. Double-checking this step will save you hassles later on down the road.
- To help prevent kinks from forming in your line, be sure to remove heavy tackle, such as lures or sinkers from the line before storing the pole.
- To reduce stress on your line, be sure to wet the line before tightening up those knots.
- Before heading out on your fishing trip, set aside a few extra minutes to check your line for any form of damage. Doing this before the trip can promote a hassle-free experience while fishing.
- Take extreme care while fixing any tangles in your line, you can potentially, yet unintentionally cause more damage by being in a rush.
Now that you are armed with a new arsenal of information, it is my hope that you get out there and have a great fishing experience. The more time you spend on the water, the more you will get to know your equipment. Maybe someday you will have plenty of fishing stories to share around the campfire.