


Survival Skills: How to Build a Shelter
 Survival Skills: How to Build a Shelter
thegearhunt.com
Survival Skills: How to Build a Shelter
thegearhunt.com
When you are in a survival emergency, a shelter should be your number one priority. Any type of severe weather can kill you in only a few hours if you don’t happen to have some sort of shelter that can keep you out of the elements. But you know, there are many materials and techniques that you can use to escape from those harsh elements. You just need to be a bit creative and industrious.
Round Lodge
 This particular shelter is actually a hybrid from quite a few different cultures. Part wiki-up, and part teepee influenced by various architectural styles, the round lodge can keep you out of the sun, cold, rain, and wind. Its structure is sort of like a teepee, but it features a doorway that is solid. Typically, this type of structure will have a hole in the roof for smoke to escape and is able to accommodate a small fire for light and heat. This type of shelter might be thatched with mats or grass, and it also might be covered with leaf litter. The round lodge was seen throughout the American west back in the day. It was even seen back in Britain before the Roman era.
Ramada
 If you happen to be stranded in an environment that is hot and sunny, you will need shade. The flat roof of the ramada doesn’t offer protection that is leak proof from the rain, but it will keep the sun from beating you to death. There are quite a few variations of the ramada, but most of them use 4 posts, a few lightweight beams, and a covering of some sort. Brush, mats, or tarps will serve as the roof of this shelter to block the sun. You can also add a few removable walls if you need to cut the breeze in the evenings when it turns cool. This is quite a versatile shelter for the desert.
Quinzhee
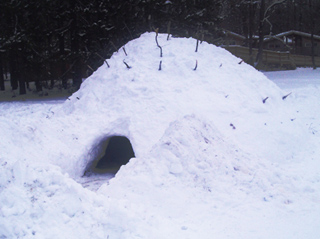 This is a shelter made from snow and shaped like a dome. It is similar to an igloo, but the quinzhee is much easier to build. If you want to build an igloo, the snow needs to be just right, but for this type of shelter, most types of snow will work. If you need to build one of these, the first thing you need to do is to pile a bunch of your gear that is moveable underneath your tarp. You might use backpacks for this, they work great. The next step is to pile snow on the tarp until it is buried. Pack this snow quite thickly so that you get walls that are about 2 feet thick everywhere. When you have done that, find about 4 dozen little sticks that are around a foot long. Insert them all-around the dome. Now, you are ready to burrow right into the side of the shelter and get your gear and tarp. Dig the snow out of the inside of the shelter until you get to the ends of each stick. This will allow you to be sure that there is a uniform thickness in your dome. Lastly, make a ventilation hole about the size of a fist in the roof and enjoy your quinzhee.
Snow Cave
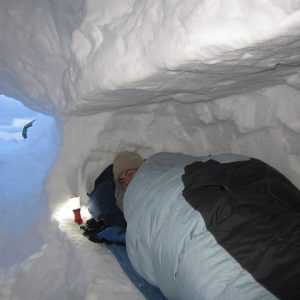 When it comes to being stranded in deep snow, a snow cave might just be your only option in terms of a shelter. This tends to be one of the most dangerous shelters that you can create though, because anyone in it may not be able to get enough oxygen, and there is always the possibility of the ceiling collapsing on them. The selection of the snow for this shelter is critical for the performance of the cave itself. First, you need to find a solid, deep snow drift or bank. You will dig right into the side of the bank to form a tunnel in a low area. This is known as the cold well, which basically, is a place where the air that is colder will collect. When you have that done, you will dig up and then over to create a platform or shelf for you to sleep on. This area needs to be the highest one in the cave. You will also need to dig a hole that is around 6 inches in diameter in the roof so that you will have a bit of ventilation. This is especially important if you will be blocking the entrance with a big chunk of snow or even a backpack.
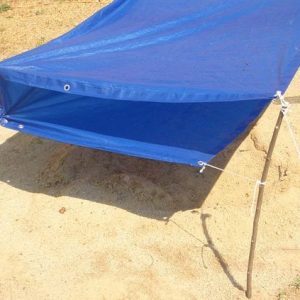
Wedge Tarp
 This type of shelter is great for situations where there is a lot of wind. The wedge form gives you an aerodynamic type of shape that is able to resist even the harshest wind as well as driving rain. You only need 5 points to tie it down, and this makes it more secure than just putting a tarp up. It even offers 2 corners for you to catch rain in if you are running low on water. To build this, you will need to stake 2 of the corners down. Then, you will tie a line to the middle of the opposite side of it. Tie down the other 2 corners of the tarp close to the ground. You can use more of your cord and an angle that isn’t as steep to get better ventilation and open wings. Put a few rocks or even chunks of logs underneath the tarp near the first two places you tied it down in order to make deep basins for the collection of rainwater. This is a shelter that doubles as a harvester for water.
Tarp Wing
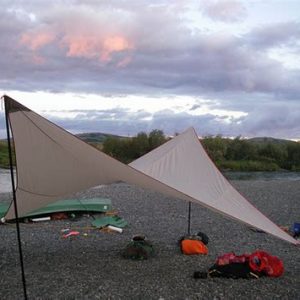 This tarp configuration might be a little bit out of the ordinary, but it is fantastic for protection from the rain. It is easy to make too. The wing is made by tying up two of the opposing corners. Put two of those corners in low positions and the other two in high positions. It will be able to sort of billow in the wind as if it were a sail, but it does work well to keep the rain and sun off.
Tarp Burrito
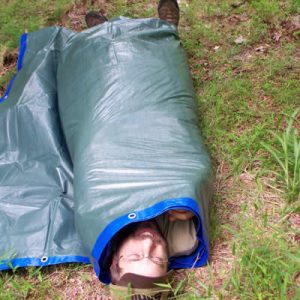 This is a low drag sort of shelter that offers you not a single frill but with a setup that can take 30 seconds or less. Just lay the tarp out in a likely location for a shelter. Fold one of the sides over about a third of the way, and then fold it again in the same direction. This will make a bit of a tarp roll and the seam should be on the bottom. Next, tuck an end of the tarp underneath so that it is closed off. Push your sleeping bag into the end that is open. When you build this type of shelter, all of the tarp seams should be on the bottom and pinned down simply by the weight of your body, except for the entrance. Just allow that to flop down when the weather is stormy, or if the weather is good, you might prop it open. Just keep in mind that like everything else, you get exactly what you pay for. You will be spending no time on ventilation, and there will generally be frost or dew inside your burrito from the water vapor that you produce throughout the night. This is especially true if your clothing is damp before you get in the burrito. Any conditions except for the driest ones will get your sleeping bag a bit wet.
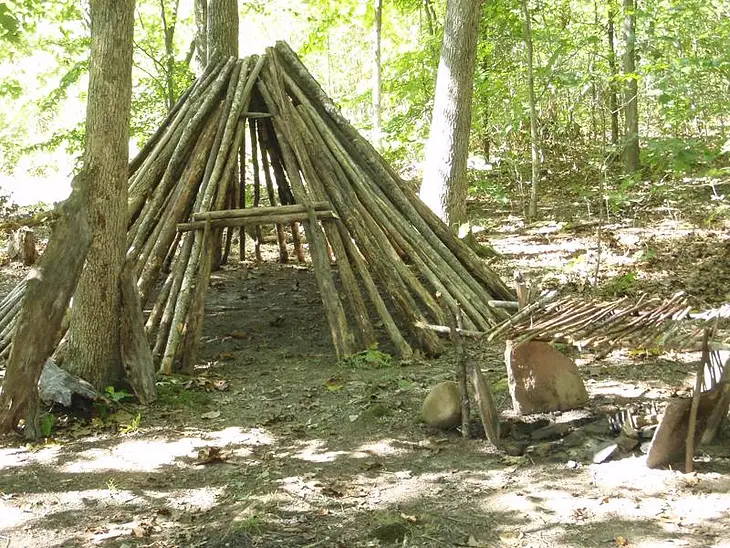
Tarp Teepee
 If you happen to have a tarp, some poles, and some rope, you have all of the necessary materials to build the versatile and mobile shelter that comes to mind first when people think about Native Americans. Traditionally, the teepee was covered by large hides. Later on, they began to be covered by canvas. For the purposes of this article, any sort of large fabric will suffice, whether it is a tarp, sails, or even parachute material. There are quite a few traditions when it comes to this type of shelter, but when it comes to making a quick shelter in the field, just go with it. Use your rope to create a bundle of a few straight branches, or you can hook a couple of forked branches to the first 3 or 4. Then, just place the other branches in a circle that will surround those main supports. Put your tarp or whatever you are using into position and tie it all down well. Try to get the size of the structure to match the size of your material so that it is totally covered.
A-Frame Shelter
 The A-frame is a design that offers you a lot of coverage when it comes to wind and rain if it is constructed near the ground. When it is built higher up, it will still give you coverage from precipitation, but it will allow more of the airflow under it. One advantage of this type up shelter is that it is constructed quickly and easily. Once you have chosen the site for the shelter, it can take less than 10 minutes to get the tarp up, and this will leave you with plenty of time to get your other survival tasks completed. To build this shelter, just suspend a line of rope between two supports or trees. Lay the tarp over this line and tie all four corners of it down. That’s it, you have an A-frame shelter.
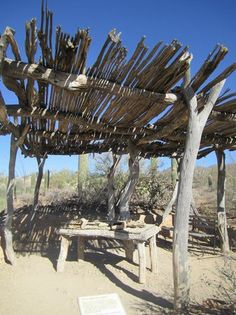
Desert Tarp
 This is a double roof sort of shelter that dates back centuries when it comes to desert cultures. It is found particularly in the Middle East and northern Africa, but over the past century, it has become more widespread due to military survival training. To make this shelter, you will need a couple of tarps and quite a bit of rope. You will need to dig a low spot in the ground. Lay one of the tarps over this spot and drive a stake into each corner of the tarp. Tie that tarp lightly to these stakes and then you will tie the other tarp to the stakes about a foot or a foot and a half higher than the first tarp. You might also fold a single large tarp to create the two layers. Tie the tops of your stakes to anchors, which might be more stakes, logs, rocks, or anything else that is strong and can be used as an anchor.
Tarp Hammock
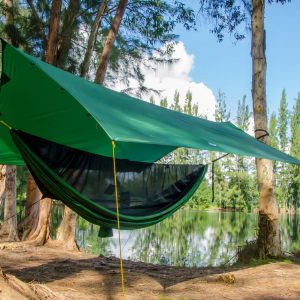 A tarp hammock is a quick way that you can improvise a hammock in order to get off of the ground when you are in bug infested or wet environments. You will need a tarp that is 8’ by 10’ as well as some braided nylon rope. Begin with one of the longer sides of your tarp and roll it ½ of the way across the tarp. Next, you will roll the other side so that what you have resembles a bundle of 2 10’ long bundles. Now, you will tie the rope tightly to each of the ends of the tarp. Be sure that you leave around 15’ of the rope on either end so that you will be able to tie it to your chosen trees. Choose trees that are thicker than your legs and are approximately 10’ apart. Tie each end of the rope to the trees, just as high as you can reach. Be sure to wrap the rope around each tree two times so that it has a great grip on the tree bark. Tie it three times. If you have enough tarp and more rope, you might consider tying the other tarp up in an A-Frame over the top of your hammock so that you will have a 1. roof over your head.
For locations that are bug-infested, tie a bit of cloth to each end of the hammock lines and soak those cloths with bug spray. This might serve to keep the bugs from walking down the lines and into your hammock. If you need snake proofing too, soak those cloths in kerosene instead of bug spray, but make sure if you do that, you keep any type of open flames away from the cloths.
As you can see, a tarp and rope are necessary for most of these shelters. For that reason, any time you are out in the wilderness, you need to have both of these things with you. They are almost as important as your water and just might save your life. Never just think that you are only going out for a day hike and you don’t need them. You never know what can happen and it is always best to be prepared.
Sources
- YouTube, How to Build a Shelter in Under 3 Minutes
- The Great Outdoors, A Night in the Woods: How to Build a Woodland Shelter
- Wiki How, How to Make a Shelter in the Wilderness
- Boys Life, How to Build a Survival Shelter