How to Fly Fish: The Complete Guide
 How to Fly Fish: The Complete Guide
thegearhunt.com
Fly fishing can be such a peaceful and serine experience for anglers. Although this type of fishing can intimidate some anglers, essentially deterring them from even trying to learn the sport. There is a lot of equipment involved in fly fishing, you will need to choose a rod, line, reel, and leaders. You may also want waders or tall boots, as some people who fly fish like to get right into the stream.
All of this can seem so overwhelming for someone who is just starting out or considering giving fly fishing a try. This experience truly doesn’t need to give you anxiety, there are options for all price and skill levels available on the market today. If your thinking of trying this sport out, don’t let those high sticker prices fool you. You have the ability to start out small and build your arsenal as you build your skill level.
The most important aspect to remember when fly fishing is to start out small. Practice is the key to success in fly fishing. Knowing the basics of the equipment and techniques will get you started on your adventure.
Fly fish for beginners
This guide was designed with the beginner in mind. Walking you through the basics for equipment and technique. By the end of this guide you should have better knowledge of the equipment used and how to get started. After that, the level of skill you develop is dependent on the practice you put into fly fishing
Fly Fishing Rods
Choosing a fly fishing rod can be much like choosing a normal fishing pole. You will first need to consider which type of fish you intend to catch. When going for a smaller sized fish a lighter weight rod comes in handy. If your in it for a bigger prize, then you may want to look for a heavier rod.
When shopping for a fly fishing rod there are three characteristics to keep in mind rod weight, length and action. This section of the guide will walk you through each characteristic and how they may affect you.
Rod Weight
Fly rods are designed slightly different from an average fishing pole, with a normal fishing pole the weight for your cast comes from your tackle like lures or sinkers. With fly fishing the artificial fly is your bait, these are very lightweight. Fly fishing is all about casting, so your weight will come from the rod and line you choose to use.
Fly fishing rod manufacturers design their rod and reel combos to hold specific weights. Each weight class has a different size and type of fish in mind. It is recommended that you follow the guideline set up by the manufacturer for the rod. This list of rod weights can give you a general idea of what you may need.
- Weights 1-4: These rods are used primarily for catching smaller fish. Great for panfish or smaller sized trout. Casts for short distances.
- Weights 5-6: These rods tend to be the most popular, especially for beginners. They work great for smaller sized streams, lakes, or rivers. Perfect for catching smaller sized bass and panfish.
- Weights 7-15: Rods with this weight are best for those with more experience. They are intended for heavier fish and can be used in saltwater as well. These are also rated for heavier flies, and where longer casting distance is needed.
It is recommended for beginners to start with the 5 weight rod. However as you gain more skill with practice, you can surely purchase an additional rod. You might want to try a heavier rod so you can go after those bigger fish.
Rod Length
Standard length for a fly fishing rod is 9-feet. However they do come in other lengths as well, they can range anywhere from 7 to sometimes over 10-feet in length. Shorter length rods are best for areas that are tight with a lot of obstacles to maneuver your casting around. Those rods longer in length are traditionally used for longer casting distances.
Fly rods can be purchased so that they come apart to be packed and transported. This makes things easier while trying to trek around with a 9-foot pole. There are various designs for taking apart these poles, they can range anywhere from 2-5 pieces. No matter which one you choose, being able to take the pole apart will not hurt the integrity of the pole itself.
Rod Action
The action of a rod is simply where the rod will flex when additional weight is added. Rod action can be broken down into three categories: slow, medium, and fast. This list will describe the three types of action to you.
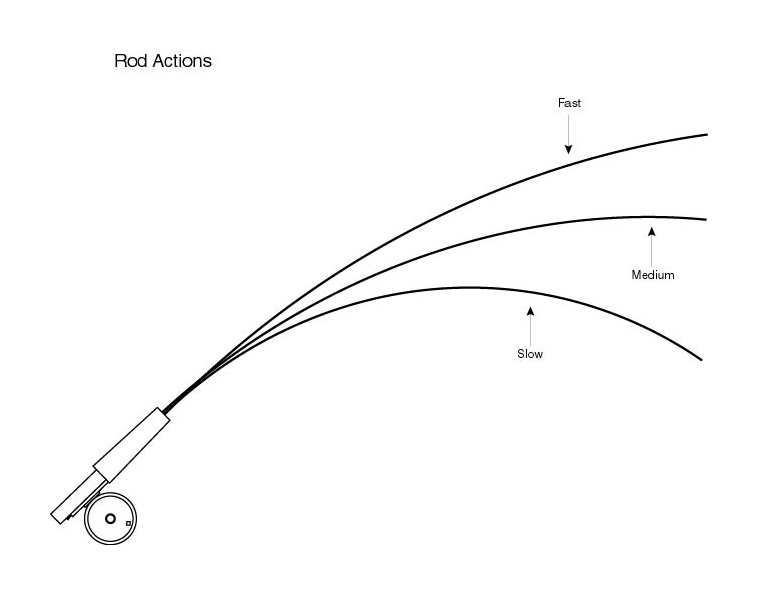
- Slow Action: This rod will flex at the portion nearest to your reel, when you have a fish on. These rods are hard to cast long for distances. Some anglers have described them as being somewhat like a whip.
- Medium Action: The medium action rods will flex more in the middle with added weight. These rods are said to have more accuracy when it comes to casting. This is largely due to the fact that there is more time during the cast to line things up.
- Fast Action: Fast action rods flex more toward the tip of the rod, giving them a stiffer feel. This action gives more power to your cast, a benefit that will help you cast for longer distances. Some anglers have complained that the tip of their pole has broken while their fish was being brought in.
One thing that has been recommended time and time again, is that you test cast the rod before purchasing one. This will allow you to see which action type works best with your casting style.
Fly Fishing Reels
Your fly reel tends to do a little more for you than simply holding your line. The reel will also provide your line with drag, this stalls your fish, not allowing them to completely run off with your line. The size of reel you will need will depend on the weight of both your line and rod, this will give you a good sense of balance in your gear. As with rods, reels can certainly get expensive. This is largely due to materials used to construct the reel. Luckily for those just starting, there are reels available that are less expensive.These reels will certainly do the trick until you get more practice under your belt. For those looking to seek an adventure saltwater fishing, be sure to find a reel that is sealed against saltwater. These tend to be more expensive than those used for freshwater, but keep in mind the reel should be clearly labeled as being sealed against saltwater.
Fly Reel Characteristics
- Materials Used for Making Fly Reels: More commonly fly reels are made from aluminum, but they can be found in materials such as graphite or titanium. If the reel is on the expensive side of the scale, it has been machined rather than pressed together. The less expensive reels tend to be formed, rather than machined.
- Fly Reel Drag: The drag system is designed to create friction, so that your fish can’t essentially run away with your line. To increase the amount of friction to your line, you simply need to tighten the lever for the drag. This will further compress the line spool increasing the friction to your line. For the more advanced fly fishing anglers, there are rells available with no type of drag system. This means that the angler themselves provide the friction to the line with their own hands.
- Fly Reel Arbor: The inner portion of the reel that the line gets wrapped around is the arbor. The arbor can come in three different sizes small, middle, or large. It has been said that the large sized arbor has more benefits to the angler than any other, Some anglers have said that the larger arbors offer better control over your hooked fish, it can be faster to retrieve the line, and your fly line tends to hold less memory on the larger arbors.
Line for Fly Fishing
Choosing a fly line can be a frustrating process, there are so many factors to selecting the line type, as it is one of the key pieces to your equipment. In this section you will find elements to fly line have been broken down, as to explain their uses more clearly to you.
Fly Line Taper
The taper in your fly line is what allows you to target your specific type of fish. Targeting these specific fish is achieved by being able to cast more efficiently, which the taper of your can help you with that. Taper is also developed to handle a multitude of fishing situations. Here you will find the four kinds of taper plus a little information about each, including the abbreviations typically used by line manufacturers.
- Weight Forward Taper (WF): This is the most popular taper available, and is the best selection for beginners. The tapered front end of the line makes the first 30 feet the heaviest. This is what gives you the precision you need for longer casting.
- Bass Bug/Saltwater Taper (BBT): This taper is relatively the same concept as the weight forward taper. With the exception that the weighted portion of the line is slightly shorter in the BBT taper. This taper is good for bass or saltwater fishing, as it allows for using heavier flies as bait.
- Double Taper (DT): This taper style is common among more experienced anglers. Double taper requires a delicate touch, with both ends being tapered, you can certainly turn this line around and get use from both sides of the line. Doesn’t hold much resistance to the wind or allow for longer casting distance.
- Level Taper (L): Most definitely not for beginners, this line is level throughout, making it difficult to use. Best suited for use with live bait.
Fly Line Density
The density of your line will directly affect what your line does in or on the water. Some lines will float, while others will float and sink. Understanding the different types of density will help you choose which line will better suit your needs. Some anglers are known to purchase extra spools for their reels. This allows them to carry different types of line, making them ready for any situation. Here is a list of the available densities and their abbreviations.
- Intermediate (I): This type of line is slightly more dense than water, therefore it will sink at a slower rate. This allows your bait to rest just under the surface. The intermediate line works well in shallow lakes as well as choppy water conditions.
- Sinking (S): These lines do exactly as the name states, they sink. Manufacturers will typically label these sinking lines with a roman numeral. The purpose for this is to show the angler exactly how many inches your line will sink per second in the water.
- Floating/Sinking (F/S): This line combines both floating and sinking, the front portion, roughly the first 5-25 feet of line will sink. The rest of the line will float, allowing for better control of the line.
Line Color Recommendations
It is highly recommended that as a beginner, you choose a brightly colored line. This allows you to double check your mistakes in technique while casting. Although if you are using a sinking line, it is recommended that you use a shade of line that is less detectable by fish.
Fly Line Backing
This is the line that goes onto the spool of your reel before the actual fly line. For fly line weighing less than 8, you should use 20 pound test backing. Use a 30 pound test backing for fly line weight of 8 or more. The main idea to using a backing line is to give you more line on your spool. As typically fly line is only 90 feet, adding the backing gives you more control over retrieving your line.

Leader and Tippet
The leader is the section of tapered line that connects the fly to the fly line. This is what gives you the opportunity to present your bait in a natural state on the water. The tippet is the end part of the leader line. It is usually the thin section of the line, this is where the fly is attached. There is a sizing chart for matching your tippet to your fly size. Most sporting good stores will have this chart readily available for anglers. One important aspect to remember when it comes to the sizing chart, tippets have an “X” rating. They range from oX to 8X, always remember that the lower the number before the X, the better the tippet.
Fly Fishing Bait
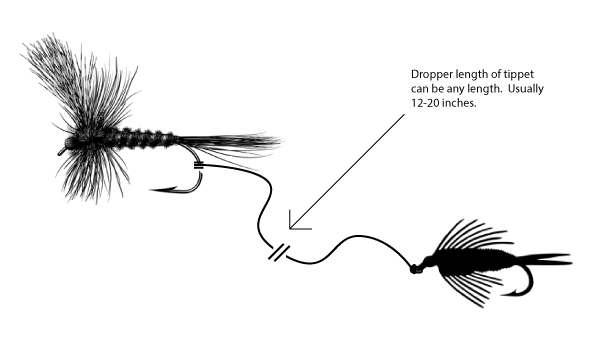
For beginners it is best to look for flies that are versatile, that means they will be good for several types of fish. You can certainly find them already tied for you, look for patterns like the Dahlberg Diver or the Woolly Bugger. These two patterns will work for several types of fish. As you become more advanced you can expand your bait inventory. You may also want to purchase a kit that will allow you to tie your own flies, as you gain knowledge and technique.
The Basics to Fly Fishing
Casting
Casting a fly rod can be perfected through practice. You will need a full fly fishing rig in order to practice, but you don’t have to have water in order to practice. You can practice in your own yard, as long as you have plenty of open space.
Before walking you through the techniques for casting, you should understand the process that takes place while casting. The difference with a fly rod is that the line casts the bait.This is opposite from your traditional fishing equipment. This section will walk you through the process that happens during the cast, this will help you have a better understanding of how things work during casting.
The Loop
During the stroke of your cast, as you bring your arm back, your line goes behind the tip of your rod. When you come forward in motion, the stroke is ended, but the energy doesn’t stop there. Your line gains the energy at the end of the stroke, this allows your line to continue moving forward, forming the loop. Here are a few tips for checking your casting technique:
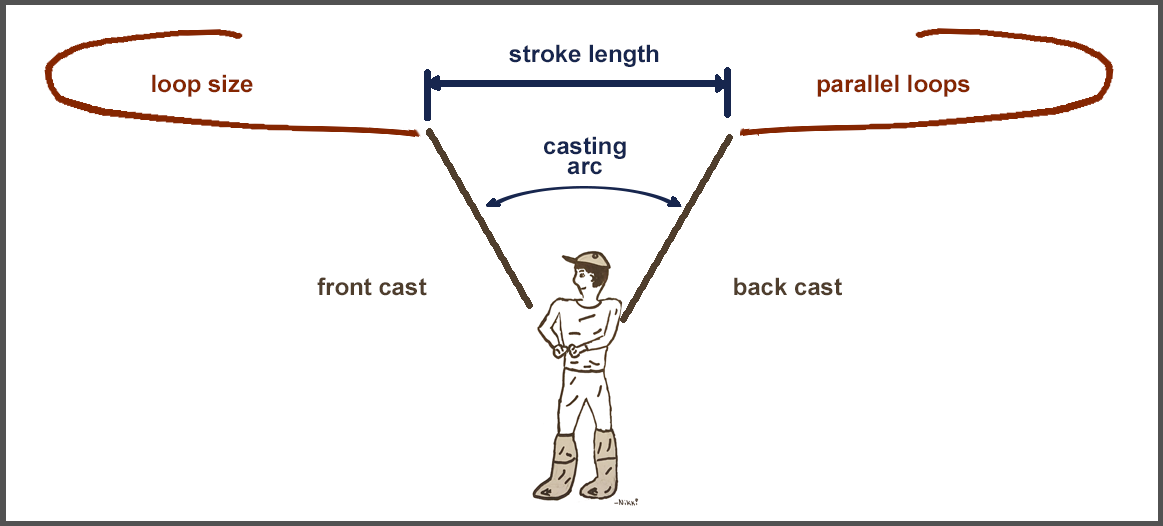
- The top and bottom of your loop should run parallel. The whole cast, if done properly, will unfold parallel with the surface you are standing on.
- Your loop should not be very wide, it should have no more than 2-3 feet of distance between the top and bottom.
- You want your loop to flow smooth, while being straight from start to the finish. Good cast will allow the whole length of your line to stretch out before hitting the water.
How to “Load” the Rod
When you hear someone talk about loading the rod, this is simply the energy you give the rod to perform the cast. Think of it like a slingshot, in order for it to work correctly you have to pull the rubber band back. The energy for the slingshot is stored in the rubber band until you release it. Once released the energy is transferred to your ammo, causing it to soar through the air. The concept is the same for casting a fly rod, the energy is obtained by making one swift movement that gains speed.
The trick to making a good cast is getting the energy from the rod to transfer to the line without a hitch. This can be done by stopping your stroke quickly, this will straighten out the rod, causing it to transfer the energy into the line. Now that you know the basics of how the pole works let’s move on to two basic casts.
Overhead Cast
The overhead cast is the foundation for many types of casts used for fly fishing. That is why it is an important cast to learn first, and be sure you learn to do it correctly. There are two motions for this cast the back cast, which creates the energy for the cast. While the forward cast releases that energy to finish the cast.
Back Cast
- First be sure that your shoulders are squared, then hold the pole with four of your fingers around the handle and your reel should be toward the ground. You will need to pull some line out of the reel and feed it through the tip of the rod, 25 feet is sufficient for this. Be sure your feet are shoulder width apart, and you square yourself off with the point you are aiming at.
- With the tip of your rod in a low position, move the rod up and behind you. Be sure you gain momentum with the stroke.
- Bring your motion to a halt when the rod gets just past the vertical position. Make a brief pause, when your line extends all the way behind you this part of the cast is finished.
Forward Cast
- When the line is stretched out behind you, start moving the rod forward gaining momentum as you go.
- Make your stopping point so that the tip is high. This will transfer the energy to the line smoothly.
- As the line moves forward, lower the tip of your rod. Your line should move forward straight all the way to your bait.
Tips for Cast Improvement
- Watch the tip of your rod while performing your stops. Making sure the tip is for both stops.
- Hold your wrist straight and keep your elbows in, this will help you use your bicep muscles along with your shoulder to do all the work. Using your wrist only adds more work to the cast.
- Stopping during the back cast should only be long enough for the line to straighten behind you. Look back if you need to, until you get the hang of how long this normally takes.
Roll Cast
Although the overhead cast works great in many situations, it won’t work when you have no room behind you. This is why learning the roll cast comes in handy. This cast uses a totally different method for “loading” the rod. The roll cast will take a little more practice than the overhead cast, and you will need to practice the roll cast by water.
- Your line must be in the water in order to create the loop needed for this cast. With the rod tip pointing down, put some line out in front of yourself. Normally 25 feet will be enough.
- With one swift, slow motion move the rod just enough to drag the end of the line across the water’s surface. When the tip is high and just passing the point of being vertical, stop your motion. Your line should be slightly loose and behind the tip, making the loop you need.
- Once this loop has formed, move your rod forward gaining momentum, with your movement. Stop your stroke suddenly, this should allow your line to roll across the water’s surface.
Tips for Cast Improvement
- When bringing your line back, be sure your movement doesn’t take the line out of the water. The friction between the line and the water are what creates the “loading” aspect of the cast.
- Pay attention to the loop you are creating, it needs to be loose. This loop should be in the shape of a “D”.
- Don’t get discouraged with the steps of this cast. They can seem slightly overwhelming at first, but with practice you can certainly improve your skills.
Learning these two casting styles will give you the stepping stone you need to learn some more casting types. Starting with the basics is always best for beginners, remember the more you practice the better you will become. Before you know it you will be casting your fly rod without even batting an eye at what you are doing.
Now that you know the basic details for fly fishing equipment and technique all that’s left for you to do is choose your location. Once you have mastered the beginning stages to fly fishing you can definitely expand both your equipment and your knowledge. Maybe fly fishing will become your new addiction.
Sources
1. Takemefishing.org, Fly Fishing Equipment: 9 Essentials for Beginners
2. Theflyfishingbasics.org, 10 Things I Wish I Knew When Learning to Fly Fish
3. Fieldandstream.com, Best Types of Fly Roe Right Rod, Reel, and Line for Beginners
4. Flyfishingforbeginners.com, Fly Fishing for Beginners
5. News.orvis.com, Understanding Rod Action and Choosing the Right Rod for You
6. Theflyfishingbasics.com, Fly Lines 101
7. Fix.com, An Introduction to Basic Fly Casting Techniques


