


Portable Camping Shower: A DIY Guide
 Portable Camping Shower: A DIY Guide
thegearhunt.com
Portable Camping Shower: A DIY Guide
thegearhunt.com
Showering is a way to relax, especially when you happen to be out in the woods camping. A camp shower is something that can be considered a prized comfort. They can be more than a bit helpful for anyone who happens to be camping. They definitely add quite a bit of comfort to the typical camping experience.
These types of showers are extremely durable and can be easier to set up than you might think. In the next few paragraphs, you will learn how to make a couple of different types of camp showers as well as a shower enclosure.
Portable Camp Shower Enclosure
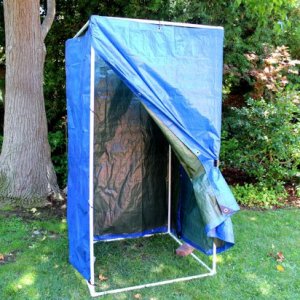 Camping might just be the ideal way to get back to nature, but that doesn’t necessarily mean that you also need to smell like the great outdoors. This particular version of a portable camp shower enclosure provides a welcome sense of privacy when you are communing with nature. It only takes a few minutes to set up and you can either hang it from the branch of the nearest tree or make it to be free standing, depending on how your shower is set up. You can also use it as an area for changing clothes. It will give you some much needed privacy, but when it comes to the water, don’t forget to keep reading and learn how to make the actual shower part.
Materials Needed for a Free – Standing Shower
- Sand bags or bricks
- Cable zip ties
- A pair of tarps measuring 6’ x 8’
- 8 PVC corner pieces measuring ½’’
- PVC pipe cutter
- 8 sections of PVC pipe measuring 3’ x ½’’
- 4 sections of PVC pipe measuring 6’ x ½’’
Materials Needed for a Hanging Shower
- Cable zip ties
- A pair of vinyl tarps measuring 6’ x 8’
- Metal washer
- String
- Eye hook screws
- 4 PVC elbow pieces measuring ½’’
- 4 sections of PVC pipe measuring 3’ x ½’’
How to Make the Free – Standing Camp Shower Enclosure
 PVC pipe typically comes in a standard length of 10’. This means that you will need to get the people at the hardware store to cut it with a pipe cutter made for PVC pipe so that you end up with the lengths that you need. Or you can cut it yourself with a PVC pipe cutter.
- Begin with the bottom of your shower enclosure. You will need to connect 4 of the 3’ sections of PVC pipe with 4 of the corner PVC pieces. You will also find these pieces being called 90° side elbows.
- Attach all 4 of the PVC sections that are 6’ in length to the pieces in the corners. These will be attached vertically.
- Now, attach the other corner pieces of the PVC to the top of the sections of PVC that are vertical. Connect the other pipes measuring 3’ to those corner pieces as well. This should give you a tall cube shape.
- Your shower enclosure will have a height of 6’. Take your tarp and turn it on its side so that it will be 6’ tall as opposed to 8’ tall. Using the tarps grommets, hang it on your PVC pipes using your cable zip ties. Be sure that you attach it to the vertical pipes also. If you want to ensure that you have the maximum amount of privacy, just make the 2 pieces of the tarp overlap, ensuring that there won’t be any openings.
- Make a choice as to which side you want the opening of the shower enclosure on. Don’t connect any of the side grommets to the PVC pipes that are vertical on the side you choose so that you will be able to open and close the tarp like a door. Finally, put your sand bags or bricks on the bottom PVC pipes so that your shower enclosure won’t fly away when the wind picks up.
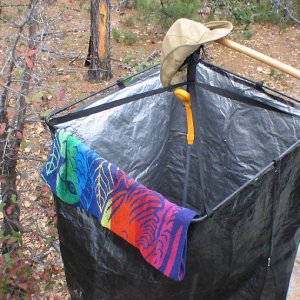
How to Make Your Shower Enclosure that Hangs
- For this type of enclosure for your camp shower, you will first need to connect your sections of PVC pipe that measure 3’ to the PVC elbows. They don’t necessarily need to be pieces made specifically for corners due to the fact that you won’t be using any vertical pieces for this type of shower enclosure.
- Attach your eye hook screws to the elbow pieces before tying your string to those hooks. Go diagonally from on corner to the other. If you don’t use these screws, your string can just slide right off of those elbow pieces.
- Where the two strings intersect, attach your metal washer. Tie a bit of wire to the top of that washer so that you will be able to hang the entire contraption from the branch of a tree.
- Just as you did with the shower enclosure we just discussed, hang your tarp from the pipe by using cable zip ties. If you prefer a bit more privacy, overlap two different tarps.
Making a Camp Shower
 Creating a camp shower using a weed sprayer might be a lot easier than you may think. You can get a simple weed sprayer from your local hardware store, or even from Amazon. You will also need a brass barb hose adapter measuring ¼’’ along with a sink sprayer like the one that is in your kitchen sink. This is all it takes to make a shower that you will be able to use on future camping trips. In camping forums, you might see these being called weed sprayer showers.
For the past decade of camping as a family, we have relied both on solar powered showers and the paid ones that you sometimes find at campgrounds. Many times, we have gone at least 3 days without a shower. Now that the boys are growing into young adults, we need showers on a more frequent basis.
If you want a quick shower, you can always spend $170 for one of the higher end camp showers that are pre-made. This might not be an option for campers who are budget minded. If that happens to be the case with you, you can always make a weed sprayer one.
Weed and bug sprayers come made from either stainless steel or plastic. There are a variety of models that are relatively inexpensive at places like Home Depot, Walmart, Orchard Supply, Ace Hardware, and Amazon. They start at around $15. The ones with the best reviews are the Chapin sprayers.
Personally, I prefer the ones made from stainless steel because they seem to be better able to deal with hot water. Of course, if you are fond of cold showers, this won’t matter. Durability is also something that must be considered because they can take more than their fair share of abuse while you are packing it in and out of your car. Also, the overall quality of the stainless-steel models is better, and they tend to remain steadier in terms of standing up.
Materials Needed for a DIY Weed Sprayer Shower for Camping
- Worm gear hose clamps – pack of 10 – stainless steel
- Brass hose fitting adapter made by Anderson Metals. ¼’’ NPT male pipe x ¼’’ barb
- Side sprayer for a kitchen sink
- 1-gallon lawn and garden sprayer
How to Make Your Camp Shower
- Take your bug or weed sprayer and cut the wand that came attached to it off. Sometimes these will be attached using a hose clamp. If yours is like this, just loosen that clamp and take the wand off. You can use the original hose clamp to attach your sink sprayer. These sprayers can be gotten from Amazon or any hardware store for as little as $10. If your weed or bug sprayer didn’t use a hose clamp, you might have to purchase one. These are also quite inexpensive.
- Put the ¼’’ pipe cap (brass) from your kitchen sprayer with its barbed adapter (also brass) into the end of the sprayer hose that you cut and make sure it is secure with one of your ¼’’ pipe clamps.
- Thread the hose for the kitchen sprayer to the pipe cap. If you want to make sure that you get a good seal, use pipe threading tape.
 Your finished product will vary, and this will depend on what you are using for your water reservoir and the pump. 2-gallon reservoirs are large enough to give you quite a nice shower. Solar showers are about that capacity and that is good for a single shower.
Of course, you can also press this sprayer into double duty and use it to wash your dishes while you are camping too. Once you have built the thing and used it, you might find yourself wondering how you ever managed without it.
How to DIY a Bilge Pump Portable Shower
 The typical bilge pump will spend its working life down in the bottom of a boat as it continuously pumps out oil, sludge, and water that gathers down in the bilges. They have been designed to be able to handle pumping for a long time, being used intermittently, knocks, and vibrations. All of this makes them ideal to use for making a portable shower. They only need 12 volts to run, and this makes them safe and able to be run from lead acid batteries, which in turn makes them incredibly portable. Making a shower from one of these items is also a task that is pretty straightforward.
Materials Needed
- 12-volt battery
- Screwdriver
- Alligator clips that are insulated
- Plastic container for water
- Electric bilge pump
- Knife
- Plastic ties
- Hose pipe
- Shower head
How to Make It
- Connect your shower head to the end of a garden hose that measures 15’. Push the hose over the shower head’s end until they are connected firmly. Seal their connection by using a plastic tie to wrap around the hose, tightening it as much as you can. Trim off any extra plastic from the tie.
- The other end of the hose will need to be connected to the discharge or out pipe of the bilge pump. Just as you did with the shower head, push the end of the hose over the out pipe until you have a firm connection and then secure it in place with another one of the plastic ties.
- Attach another length of hose to the bilge pump’s in pipe utilizing the same method as above. This hose needs to be long enough to go from the bilge pump and through the top of whatever you are using to store your water and to the bottom of that container. Make sure that your water container is as near the bilge pump as you can get it to make the pumping efficiency as good as it can possibly be.
- Strip the last ½’’ of the insulation from the wires that comes out of the bilge pump. Attach one of the alligator clips right to the end of each one of the wires by loosening their terminal screws. Loop that stripped wire right around the screws and then make it tight so that the wire will remain in place. Make sure that you use a red clip for positive wires and black clips for the negative one. Pull gently on each of the wires to ensure a proper and tight connection.
- Fill your water container all the way to the top. Feed your hose from the bilge pump right into the container and push it all the way to the bottom.
- Ensure that your shower head isn’t pointing at or near your battery and the pump. Connect your positive alligator clip to the battery’s positive terminal and the black clip to the negative one. As you do this, your pump should begin to work. It should take the water from your water container and push it through the shower head. Now you just have to hold the shower head where you need it to flow while you take a shower.
As you can see, with camping showers and enclosures that are this easy to make, you no longer need to go without a shower while you are getting back to nature.
Sources
- Instructables, Make a Portable Camping Shower
- YouTube, How to Make a Camping Shower – Life Hack