


Ice Climbing: Everything Beginners Need to Know
 Ice Climbing: Everything Beginners Need to Know
thegearhunt.com
Ice Climbing: Everything Beginners Need to Know
thegearhunt.com
You might have a friend or two who can’t stop talking about their ice climbing trips on the weekends. You might already be a rock climber and are looking for a way to make the climbing season last longer while not having to shred your hands on sharp plastic holds. Or, you may have seen some amazing pics of people who are scaling gigantic icicles and can’t help but to think that this is something that you have to try.
Whatever the case, you are in for a real treat! Once you understand just what you are getting yourself into and have taken the time to prepare properly, you will quickly find yourself falling in love with ice climbing and you won’t be able to get enough of it.
Ice Climbing Defined
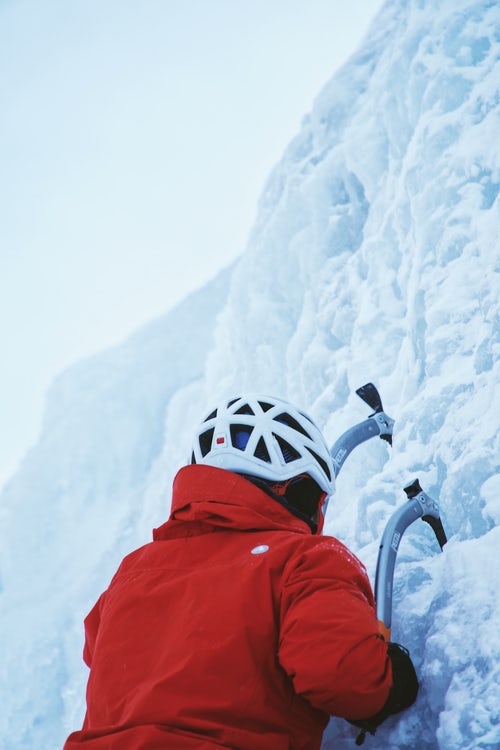
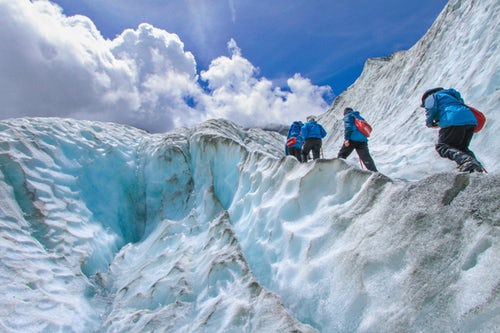
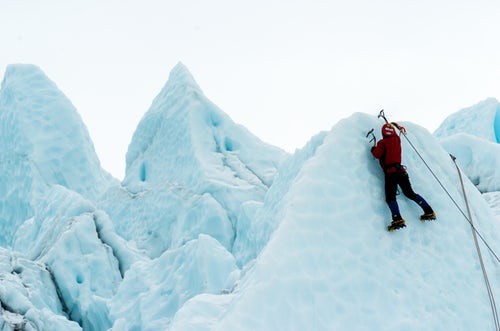 This sport is exactly what it sounds like. It is the action of climbing formations of ice. Typically, it will refer to things like rocks that have been covered in ice, cliffs that have been covered in ice, frozen waterfalls, or icefalls.
There are really 2 main types of climbing ice:
- Alpine ice is located in mountains and is typically an attempt to climb a mountain. The ice will be precipitation and will generally be a section of a longer route.
- Water ice will generally be found either on a cliff or beneath some other type of water flow. Generally, these are scaled just for the technical challenge of the sport.
Learning the Ropes
The absolute most important bit of advice that we can give when it comes to getting into this activity might also just be the one that is the most obvious. TAKE A LESSON! It doesn’t matter if you sign up for a formal course or if you spend some time on the ice with a friend or two who have been participating in this sport for a few years, you need to spend a bit of time with people who are ultra-familiar with the activity and can show you the ropes – safely.
Aside from learning the ropes from a professional, taking a class can also save you a bit of money when it comes to equipment, since most of them will provide you with things like climbing hardware, rope, helmet, harness, ice tools, crampons, and boots. If you go out and try to learn this sport on your own, aside from the danger involved, the equipment would cost you more than $1000. Aside from that, you won’t learn how to properly use the equipment, so your very first excursion could very well also be your last.
What You Should Wear
 Sunglasses – You will definitely need a good pair of sunglasses. They will help to keep the ice out of your eyes while you are on the wall, and believe it or not, the ice can be absolutely blinding on sunny days. You need to make sure that they fit securely.
Waterproof jacket – After all, you will be on the ice.
Waterproof pants – Same as the jacket.
Waterproof gloves – These will need to be the appropriate weight for whatever the weather is. For example, when the weather is warm and nice at the end of the season, you might want thinner gloves that aren’t waterproof to allow you to feel the ice better. However, during the rest of the season, you will need the waterproof variety.
Insulated layers – Again, this will depend on the climbing conditions. In warmer weather, you might only need your waterproof shell.
Balaclava and/or a warm hat
Waterproof boots – These are for when you will need something a bit more comfortable during the approach.
Backpack – This should be waterproof when possible and you will need it to carry your food and water, photography gear, and extra clothes.
Technical Gear:
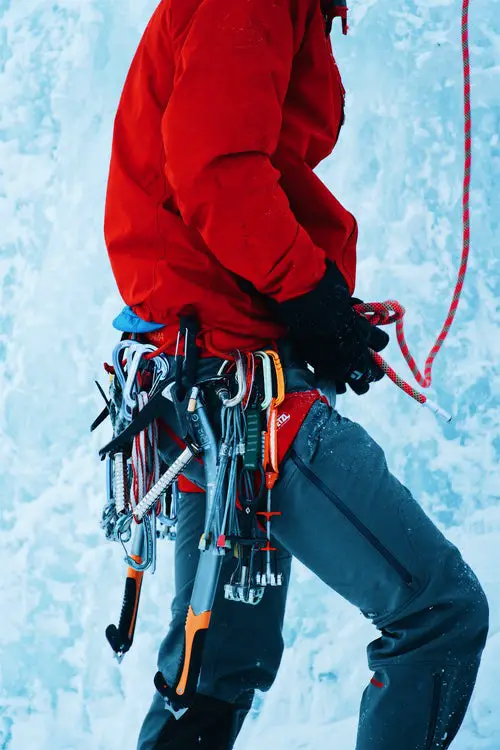 Boots for mountaineering – These should be fully waterproof and insulated.
Crampons – Wear these over your boots and use them to dig your feet right into the ice.
Ice axe – You can use axes 50-65 cm long to climb the wall. This size is lighter and can be easier to use.
Climbing harness – Just as the case with rock climbing, you will use these to secure you to the rope as you are belaying and climbing.
Climbing helmet – Whether or not you are climbing, it is a good idea to have one on at all times. Chunks of ice can fall from the wall and come tumbling right on your head. With rock climbing, you will typically yell out if some rocks come loose. This isn’t done in ice climbing because it is constantly happening.
Belay device – You can get different types of devices for abseiling and belaying. The gri-gri will give you more security than ATC.
Carabiners – Again, you can get different types to assist with attaching ropes at different points and to create anchors.
Photography Gear:
This will depend on both the situation and the weather. You should remember though that whatever you bring in, you will need to carry for the entire time until you get back to your car.
Lowepro backpack – These are great backpacks when it comes to adventures outdoors. They are easily secured while climbing, you can leave them on your hip too so that you will be able to have access to the gear you need when you need it. There is also a rain fly in the event that you need to put it right down in the snow.
A good camera
16-35 mm lens – Because you might be close to a waterfall, wide lenses will assist you in capturing the size of it.
100 or 70 – 200 mm lenses – in the event that you want to take close up shots while climbing.
Tripod – Take one with you just in case you get into a darker canyon.
Snacks and Drinks
You will more than likely be out for more than ½ of the day and will need to keep hydrated and keep your energy up.
Lunch – You can bring sandwiches, but they will more than likely get soggy, so you might want to bring along something else that will be ok and try to keep any sauces or condiments packed separately.
Snacks – During any sort of outdoor activity granola bars, beef jerky, trail mix, and the like are always good options.
Water – You will need plenty of water. If you like keeping your drinks insulated, you might want to use a Hydro flask.
Going it Alone
 Once you have taken a lesson or two and you have made the investment in the necessary gear, it will be time to go out on your own. You might not be sure where to go, and that is alright. Just ask around at your local outdoor shop or a climbing gym. You can also find great resources online that will help you get your trip planned. Www.NEice.com is a great tool for planning trips.
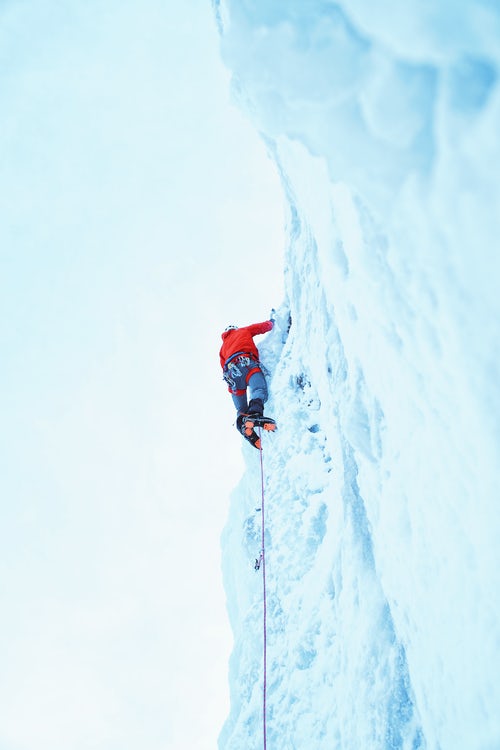
Top-roping on the ice is just as exciting of an adventure as leading is, and when you are heading out on your first trip, this is a fantastic way to build up your confidence level. Most new climbers to the ice have a difficult time in believing that the actual pick on their ice tool needs to be only a centimeter into the ice in order for it to be secure and running the laps during a short top-rope sort of route will allow you the opportunity to learn to trust in your crampon and tool placement.
Once you begin to get more comfortable with the ice and feel like you are up to the task of leading, be sure that you go with climbers who have a bit of experience. They will be able to assist you with fine-tuning your newly learned skills. Also, they will more than likely know some of the best places to climb. Rock climbers can be a bit lax when it comes to making sure that they wear their helmets, but keep in mind that you ALWAYS need to wear your helmet when you are climbing ice. Chunks of ice tend to break off considerably easier than chunks of rocks, and you need to always assume that the chances are good that you will be hit. Also, if you hear someone yelling ICE! they are essentially warning you that ice is falling, and you shouldn’t look up. This is one mistake that newbies make quite a bit.
Learn the Lingo
When you begin ice climbing, you will need to learn quite a few new terms. The following is a list of some of the most common ones that you will need to know.
Adze – this is a shovel-like blade that you will find on your ice ax. It is used to chop away any ice that is loose.
Bollard – This is a large part of snow, ice, or rock that you can use as an anchor for belaying.
Couloir – A steep gorge or gully that is often filled with ice or snow.
Dry tooling – Using crampons and ice axes for climbing the rocky parts of routes that are mixed.
French technique – Walking on ice that has a low angle in a way that everything except for the front points on your crampons is in contact with ice. This is also called flat footing.
German technique – This is when you kick just the front points on your crampons into ice on steeper slopes. This is also called front pointing.
Neve – This is a permanent type of granular ice that forms during repeated thawing and refreezing.
Piton – This is a sort of protection that you pound into the ice with the hammer part of your ice tool. However, this piece of equipment isn’t quite as frequently used as the alternative – ice screws.
V-thread – This is a type of anchor that you will make in the ice with 2 ice screws placed in a V formation.
Verglas – the thin layer of ice that will form when melting snow or rain freezes on top of rocks. This is difficult to climb due to its thickness.
A Few Beginner Tips for Ice Climbing that can Improve Your Technique
 By using these movements and techniques you will get a lot of great first-time placements. However, if you don’t, it is always best to place the ax again as opposed to trying to move up the ice with placements that might not be too safe. To that end, let’s take a look at a few tips that will help you with the right basic technique.
Begin with your feet level and your hips against the wall. The very first aspect of moving on the ice is to consider your overall body position. The ideal position will be one which have your feet roughly at the same height and your hips placed tightly against the wall. Your back should be arched.
Arch your back and lean a bit back when you swing your ax. Making sure that you are leaning back and that your back is arched while you swing your ax will give you the space that is necessary to give the ax a good swing. It also gives you the opportunity to see the type of terrain ahead of you.
Keep your arms straight while you are swinging your ax. When it comes to mistakes made by ice climbing beginners, this is the most common one. Especially when they are insecure with the ice and attempt to compensate for that insecurity by keeping their arms folded and leaning into the ice before trying to get more of their weight resting on their feet. The actual effect is nearly always the opposite. When you bend your elbows, you will need to have a harder grip, and this makes it even more difficult to properly swing the ax.
Flick your wrist when you swing the ax. The ax should be lifted behind your head, and as you swing it toward the ice in front of you, follow up with a flick of your wrist in order to increase the acceleration to penetrate the ax into the ice.
Hang straight and lean forward when you kick the crampons. When you are putting one ax right above another one, it will be time to move your feet as well. Leaning backward with your hips right up against the wall or having a straight posture will make it more difficult to find the best places for footholds. It also makes it quite difficult to kick the crampons right into the ice.
What you should do is to hang on to the ax while pushing your hips father away from the ice before moving your feet up. This makes choosing placements for your feet much easier.
Finally, when you are climbing ice, you are at Mother Nature’s mercy. She can be rather grumpy in the colder months too. You should keep in mind to always let someone know what your plans are for your trip.
Sources
- You Tube, Basic Ice Climbing Techniques with David MacLeod
- Local Adventurer, Intro to Ice Climbing Jasper National Park
- Yamnuska, Ice Climbing
- Skyshook Adventure, Beginners Ice Climbing