


How to Create a European Mount: The Complete Guide
 How to Create a European Mount: The Complete Guide
thegearhunt.com
How to Create a European Mount: The Complete Guide
thegearhunt.com
Taxidermy is one of the most breathtaking forms of preserving your most valuable hunting trophies. Although beautiful, most of the mounts you get done are very costly, and can be a hassle to maintain there beautiful appearances. Over time those wonderful looking shoulder mounts become dingy from dust and of course age. Not to mention, these can get expensive, when you spend a ton of time in the woods bringing home a fresh prize every hunting season.

There are occasions, such as in my family, where you have more than one hunter, so there isn’t always room in the budget or on the walls for such things. Have you ever considered trying to preserve the skull to mount it yourself? Traditionally done in Europe, hunters would strip and then preserve the skull as a trophy from their hunting trip. These mounts are called European Mounts, they can be done rather easily, are cost effective, and you don’t always have to have them hanging on the wall. Did I mention how great they look?
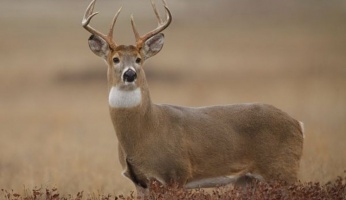
Making a European mount
There are several step to processing a skull for European mounts, but with enough patience and persistence you can do these on your own. Many people have different ways for achieving the same end results, this guide was created to put a few of these methods and ideas in the same place. Making it easier for you to decide which method might suit your time or needs more efficiently.
Preparing The Skull
- The first thing you will need to do is remove the head of the deer, to successfully do this there are a few step that you can follow. From right behind the ears of your deer, make a deep cut all the way around the neck, make sure this cut goes right to the bone. Next you will need to find the joint that connects the head and neck. You should have exposed this joint while cutting the neck, once found the joint will need to be cut apart. In order to fully remove the head, some twisting may need to be done to free the head.
- Using a sharp knife, start at the back of the skull, making a cut line that goes right to the bone. Form this line from the back of the skull, traveling between the eyes, and end at the the mouth. This will mean that you will need to cut over the top of the nose ae well. If you are working with the skull of a buck, remember you will also need to cut around the antlers to remove the surrounding skin.
- It is now time to remove the skin from the bone, gripping one side of the cut you made, pull the skin away from the bone. You will want to use the blade of your knife to cut away the tissue holding the skin to the bone while you pull the skin free. You will need to remove the ears from the skull as well, cut them off as close to the base of the skull as you can. It is best to scrape as much tissue and meat off the skull as you can while you take the skin off.
- Next comes removing the lower portion of the jaw, to find the joint that holds the jaw, simply open the mouth as far it will open. Once you have located the joint inside of the mouth, you will need to continue holding the lower portion down, so that you can cut the tissue holding the jawbone in place. Do this process on both the left and right side of the jaw, apply more pressure to the jaw, this will expose any remaining tissue that you will need to cut. Once you have cut away all the tissue the lower portion of the jaw can be removed.
- This step can seem gruesome, you will need a set of thin pliers, to hold the tissue portion that hold the eye within the socket. Using the blade of your knife, cut a circle around the inside of the eye socket, as you use the pliers to pull the eye from the socket. Repeat the steps for the opposite eye.
- The last step will be to remove as much of the brain as possible. What is found to work best for this is using a metal coat hanger that has been taken apart. Insert the coat hanger into the opening on the underside of the skull where the spine would normally be. Use the coat hanger to essentially “scramble” the brain, turn the skull over to remove the brain matter that has been loosened. Keep going until you feel that you have removed as much of the brain that you can.
Removing Any Leftover Tissue
If your into bugs, dermestid beetles can make the process of removing the leftover tissue a breeze. They are known to have a skull completely cleaned in a day or two, which does relieve some of your work. The biggest down fall to this, you will have to maintain the care of the dermestid beetles, which can be a lot of work in itself. For most, this is not a feasible option, but nonetheless it is still an option.
Boiling

This is the prefered method by many, you will want to gather a few items first. You will need: a taller pot filled with water to cover the skull, dish soap, and a heat source. Trust me when i say, DO NOT attempt this in your kitchen, this is best done outdoors. You can use a propane burner, like one for a turkey fryer, or i have even use the burner of my gas grill. Once you have placed your skull into and filled your pot with water, add roughly ½ cup of dish soap, and begin heating the water to a boil. Adding the dish soap will help combat the natural oils from the bone and any oils that will come from the tissue during the boiling stage. Therefore reducing the amount of stains you might see on the skull. When your water reaches a boil, turn the heat down so that the water holds a simmer, continuing a hard boil can cause damage to the smaller bones within the skull.
Time this simmer for approximately thirty minutes, then remove the heat and leave the skull to soak for another thirty to forty minutes. This step will make the leftover tissue softer, while aiding in the removal of the oils that might be left behind. Note: If this is a doe skull, you may need to rig a wire through one of the eye sockets to create a hanger for removing the skull from the water. If you are preparing the skull of a buck, you might want to put either plastic wrap or tin foil sealed with tape, over the portion of the antlers that may come into contact with the water. This will protect them from possible damage or color change.
Cleaning Your Skull
There are a couple of ways in which to handle this part of the process, the first is to simply scrape the remaining tissue from the bone with a knife blade. This part can take some time and may require several sessions of boiling to complete. As you will need all of the tissue removed, and it is easier to remove the tissue from a skull that is both wet and warm.
Your second option is to use a pressure washer, you will need to secure the skull to something heavy or stationary during this process. You may also consider wearing rain gear, to combat soaking yourself while washing the skull. Using the pressure washer to spray the skull with some force to remove the excess tissue from the skull. Be extra careful in the nose area of the skull, there are thinner bones in that area that can sustain damage from the water pressure.If you notice that the tissue isn’t coming off that well after a while, you may want to simmer the skull again, for no longer than than fifteen minutes. This will loosen the tissue, this time instead of using the pressure washer, use your knife blade to remove the leftovers inside and out. Allow the skull time to fully dry before moving to the next step of the process, this can be done with heat or letting it dry naturally on its own.
Whitening Your Skull

This part also has at least two options to choose from, use whichever suits your need. The first option, you can purchase whitening agents at your local hardware store, you will need to follow the manufacturer’s directions for use in order to whiten your skull. Taking precautionary measures to protect the antlers on the skull. This is the faster of the two methods, but depending on your area, you may have trouble finding whitening agents.
The second option requires you to use over the counter peroxide as your whitening agent, this method is relatively cheap, but does take at least 5 days to whiten. All you need to do for this one is find a container deep enough to allow you to submerge the skull, making sure not to submerge the antlers, in peroxide. For the antlers, rather the area between them, wrap them with gauze, you can then add peroxide to the gauze to whiten that area. Be sure to keep the gauze wet with peroxide,for better whitening in that area. After 5 days remove the skull from the peroxide and take the gauze off, let the skull dry for one week. After that week, if you notice any residual buildup around the antlers, this can be taken off with a small wire brush. In the event your antlers need touch up color, brown and black wax made for shoes does a great job for color touch ups.
Seal Your Mount
Now that you have whitened your mount, you can add a wire to the reverse side of the skull for a hanger. Normally 5 inches of wire is plenty, there should be two holes on the reverse side of the skull that you can feed the wire into, then twist them to make a loop for hanging. If you don’t want a crooked hanging skull, take the time to be sure that the skull sits in the center of the wire before making your loop. Now hang the skull from a fence or such space for spaying a sealant on the skull. The best thing for sealing the mount would be to spray it with a clear polyurethane. Spray one side, let it dry fully, then turn the skull and sprat the opposing side, making sure that you take the time to spray the antlers as well. For best results, give your skull at least two coats with the polyurethane, then allow adequate drying time. When the mount has fully dried, you can now hang it as you desire.
Hanging The Mount
This to me is the fun part, since we do our own European mounts, we get to really be creative with our hanging style. You can buy plaques, and mounting devices premade for hanging your mounts should you choose to do so. I have seen them directly hanging on the wall with no background at all, some have pedestals that they sit on instead of hanging.
Some of the most beautiful mounts I have seen hanging come from materials found while scouring around. Driftwood that has floated up on the beach makes for an amazing look, pieces of wood from old structures also give your mount a unique look. I have seen people use a smaller section of a tree to create a stand, allowing them to hang more than one on the section of the tree, looking like European Mount tree. There are also techniques out there for painting your mount, although I prefer a more natural look, I have seen some done they are unique and might be your style. To me the possibilities for changing up the look of the mount are endless, allowing you to add your own amount of flair to your design.

As you can see, there are several options to choose from for creating a European mount, only you can choose the best option for yourself. I do highly recommend making a couple of practices runs on the skull of a doe or two before tackling one of your prized possessions. This way you can work out any wrinkles to your system, giving you perfect results when it counts. Remember the sky’s the limit when it comes to adding your style to the hanging of your mount.
Sources
- www.realtree.com, How to Do Your Own European Mount
- www.instructables.com, European Mounted Deer
- www. outdoorlife.com, DIY: 3 Ways to Make Your Own European Mount
- www.gohunt.com, DIY Taxidermy: European Skull Mount